Re: DIY Biochar
Quote:
|
Re: DIY Biochar
Quote:
Al's gritty mix. Thanks for the link.... I have made that fantastic mix a few times.....with crushed lump charcoal aka "biochar" "char" 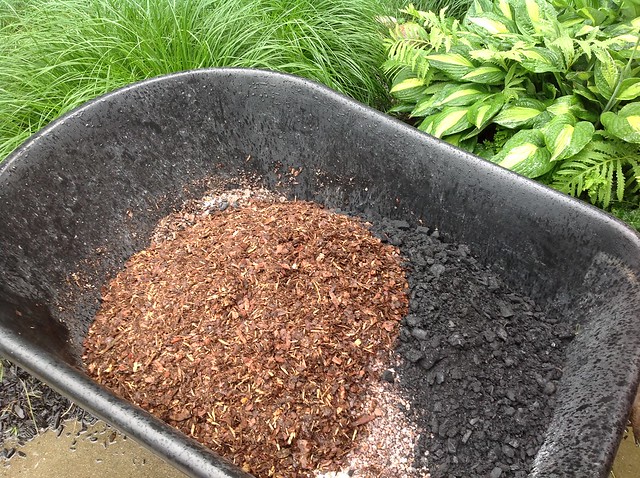 Al's gritty mix with crushed lump charcoal by Hostafarian, on Flickr. |
Re: DIY Biochar
Ok, sound s like a lot of you have a very good understanding of this topic. I am curious what yor thoughts on this question might be.
I do make my own charcoal in 2 different ways. I have a top down updraft burner I made out of a couple of 55 gallon drums which I will fire up 2 times a year or so using wood chips, branches, small tree trunks, etc. and I also have a regular burn pit into which I throw most other things that don't go into the compost. With the burn pile I of course get a lot of ash but also a lot of what looks like charcoal. With the tdud burner it's of course all charcoal, very little ash. My question is this: is there a significant difference between the 'charcoal' from the burn pile and the tdud burner? |
Re: DIY Biochar
Quote:
The pure charcoal will need to be activated and it will have a more neutral pH. It's all in the details. If you want to make real Terra Preta, use the stuff from your burn pile and maybe break the bigger pieces up. Add sawdust and other composting materials like coffee, grass clippings, meat and bone scraps; anything that will break down, and let it sit for a few seasons, turning occasionally. You can also add some sand. When you harvest this, just like a crop itself, make sure you get all of the dirt from underneath as well and mix it thoroughly. Terra Preta was essentially what came out of garbage pits. They found it was very fertile, and began a regime of mixing it into their poor soils. While the potsherds may act like stones in your garden, do you really want it there? The broken pottery is in the original formula simply because these were trash heaps. I suppose you could recreate this with gravel or volcanic cinder (what most stores mistakenly call lava rock), but it certainly isn't necessary. Since you're in BC, you probably have access to some good, rainforest floor humus nearby to add in as well. Probably longer than you wanted, but while it was technically a yes/no question, it needed some further explanation. If you ever have the opportunity to visit a place like Yellowstone that has burned, look at the same spot ten years later, and you'll see the advantages of having all the other things like ashes in the ground as well. |
Re: DIY Biochar
Wow, detailed response, thank you!
When you say 'activated' what specifically do you mean? I hear the word 'charged' used a lot to denote the process of promoting nutrient uptake before using around plants. And then there is 'activated charcoal' which as I understand it is a product specifically processed, haven't researched how its done, to increase surface area. Are you talking about one of the above, both, or something different? Thanks again for taking the time!, very much appreciated!! |
Re: DIY Biochar
Activated/charged is the same thing. A gram of charcoal has the square footage in surface area, of a couple football fields. And you thought a cat having the same square footage as a ping pong table was amazing!
Needless to say, charcoal is very absorbent. If you don't fill those voids before you put it in the ground, it will suck all of the nutrients out the soil, as well as almost all of the water you add. So, you need to activate or charge it, by subjecting it to nutrients and moisture. Different wording, but it means the same thing. Inoculated is another word. I could go on ad infinitum about this, so if you have additional questions, feel free to PM me, or email me via the addy on the redwood site. Unless inquiring minds want to know, in which case I'll share what I learned almost three decades ago, when first potting redwoods. |
Re: DIY Biochar
Activated/medical grade char has an additional controlled process which an additional inert gas(look it up) is introduced in the char process which increases the porosity of the char.
Backyard burners do not achieve this. But... what we backyard growers do is adequate. Charcoal becomes biochar after it is introduced to the ground. Btw I made 2o lbs dry weight the last few days. soaking/charging in three 5 gal buckets. I used a 1/2 cup Espoma Bloom buster with a teaspoon of mychorizza as a kicker per bucket. Cost 16.00 us |
Re: DIY Biochar
Quote:
And I agree with Cincinanna - Sharing whatever knowledge you feel like sharing on the forum works for me too! |
Re: DIY Biochar
As requested, here is a pic of 2 different charcoal making burners of different sizes.
Super easy to make! The bigger one is made from two 55 gallon drums and a heating duct and the smaller one is made from a 5 gallon paint can, a standard paint can (not really necessary) and....well, another piece of heating duct. total time to construct both about 3 hours Total cost was about $35 US - most of that because I couldn't find free 55 gallon drums. |
Re: DIY Biochar
Quote:
I suppose you did all the cutouts with a wheel or torch? Do you make your char for the BBQ or the garden? Looks like a project that would be interesting for me to do. |
Re: DIY Biochar
Quote:
|
Re: DIY Biochar
Quote:
The smaller one was my first attempt. It works OK but not great....smokes way too much....not enough venting at the top or really space for more without compromising fuel space....I could add another venting chamber....but it will still only make a small amount of char at a time. I went back to the web to refine the design a bit and then made the bigger one....it works much better. If I had to do it over again I might consider a tall cone chimney instead of the pipe.....I guess I could always retrofit it but it works well enough to serve my purposes. Cutouts done with a recip saw and metal blade - just like butter. Also, what you can't see in the pic are all of the holes in the bottom of the barrel. If I remember correctly I used a 3/8 metal bit and drilled about 60 holes or something like that. I mostly just make it for the garden although I have made it for the BBQ at a friend's request. He claims it works well. I am a lazy gas griller;) Super easy to do and cheap. There are a lot of different designs out there and I chose this style because it was simple, inexpensive and functional. |
Re: DIY Biochar
Quote:
|
Re: DIY Biochar
Made some more today......plants love it..:woohoonaner:
|
Re: DIY Biochar
I picked up 30# for less than $20 at Sam's. In the process of smashing it down and running through the blender on this 4th of July. I may get 10 gallons of powder to inoculate for the other two beds. :goteam:
|
I Made Rice Hull Biochar
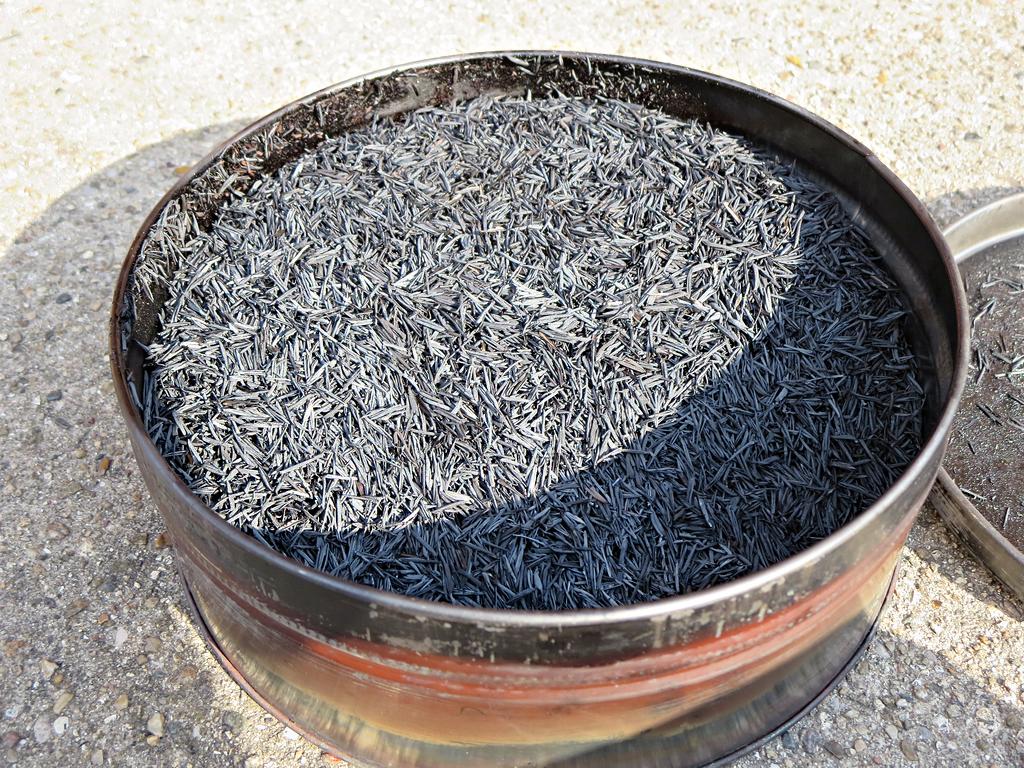   I drilled holes in the bottom of this can and filled it with rice hulls. Then I turned on an exhaust fan installed in a window and opened a window near my kitchen. I put the can on a stove burner. The gases that escaped from the bottom of the can fed the flame of the stove burner, turning it yellow. Although it didn't smoke, because the burner flame burned the smoke, it did stink and set off smoke alarms. I had to grab the can with tongs and shake it to redistribute the hulls because the hulls near the top didn't get hot enough. I am going to experiment using this as a substitute for perlite in mixes with peat moss. First, using tomato seeds. |
Re: I Made Rice Hull Biochar
Quote:
|
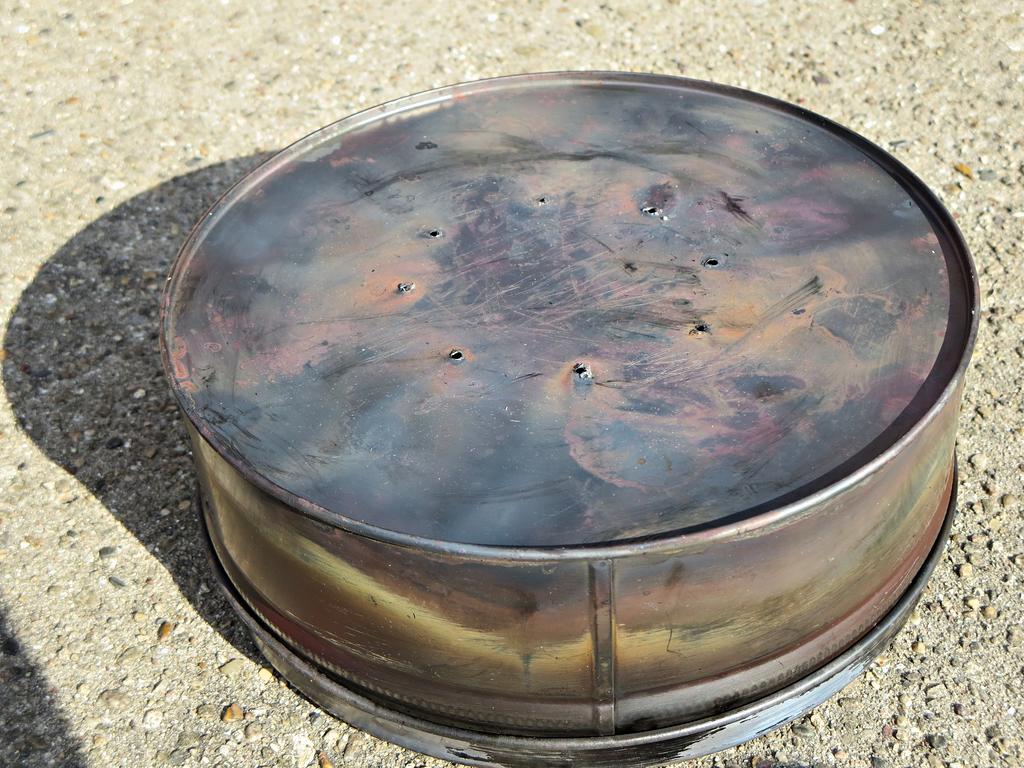
Re: DIY Biochar
Nicely done. How big is that container and how long did it take?
|
Re: DIY Biochar
Quote:
It took about half an hour but I didn't time it. |
Re: DIY Biochar
Time to get the supplies for your pot buster soilless mixs.:)
This year there are a few more great videos on the internet on how to make your own soilless mix and save you money on your indoor and outdoor grows. Ingredients peat or coir perlite lump charcoal pine fines any secret special amendment you have .  How to bust up your charcoal for your soilless mix by Hostafarian, on Flickr. .  Supplies for the soilless mix for all of your plants. by Hostafarian, on Flickr |
| All times are GMT -5. The time now is 12:53 PM. |
Powered by vBulletin Version 3.6.8,
Copyright ©2000 - 2026, Jelsoft Enterprises Limited.
All content © Bananas.org & the respective author.