|
|
|
Welcome to the Bananas.org forums. You're currently viewing our message boards as a guest which gives you limited access to participate in discussions and access our other features such as our wiki and photo gallery. By joining our community, you'll have access to post topics, communicate privately with other members (PM), respond to polls, upload photos, and access many other special features. Registration is fast and simple, so please join our community today! If you have any problems with the registration process or your account login, please contact us. |
|
|||||||
| Register | Photo Gallery | Wiki | Map | Today's Posts | Search |
| Tiki Hut All other posts go here. Banana jokes, travel stories, anything else you would like to chat about. |
 Members currently in the chatroom: 0
|
|
 |
The most chatters online in one day was 17, 09-06-2009. No one is currently using the chat. |

 Email this Page Email this Page
|
|
|
LinkBack | Thread Tools |
 01-19-2014, 12:58 AM
|
#1 (permalink) |

Location: CUMBERLAND, MD.
Zone: 6-7
Name: TRAY
Join Date: Mar 2011
Posts: 151
BananaBucks
: 38,903
Feedback: 0 / 0%
Said "Thanks" 543 Times
Was
Thanked 182 Times in 82 Posts
Said "Welcome to Bananas" 681 Times
 |
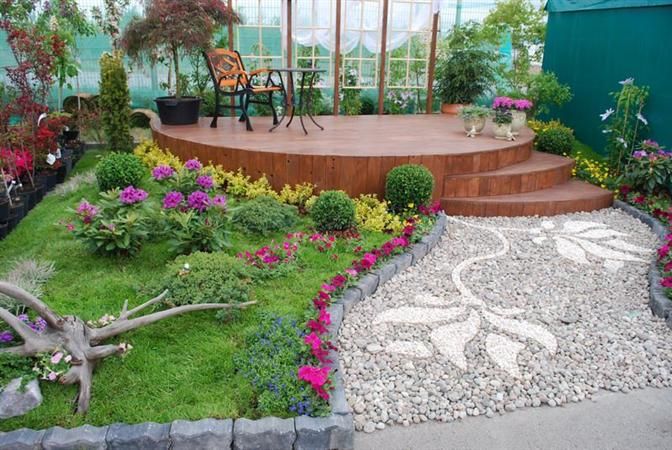
I found this nice landscape pic on the web, but what caught my eye was the design in the rocks. This is something i would like to try and do but exactly how it was done eludes me. My best guest is they used some kind of pre-fab/homemade form (which i could find no such form on the web) poured concrete, added gravel in the top and painted it. My problem with that would be the pointed and thin spots would crack or break in due time when stepped on, so i was wondering if anyone had any thoughts on how this was done and stabilized, considering it's raised and supported by loose gravel?
 |

|


|
 | Are you a banana plant enthusiast? Then we hope you will join the community. You will gain access to post, create threads, private message, upload images, join groups and more. |
|
Sponsors |
|
01-19-2014, 01:19 AM
|
#2 (permalink) |
|
Banned
Location: San Diego
Zone: 9-11
Name: Tony
Join Date: Apr 2008
Posts: 18,429
BananaBucks
: 1,627,784
Feedback: 8 / 100%
Said "Thanks" 3,210 Times
Was
Thanked 20,593 Times in 7,760 Posts
Said "Welcome to Bananas" 2,716 Times
|
Rubber
|
|
|
|
|
01-19-2014, 01:44 AM
|
#3 (permalink) | |
|
Location: CUMBERLAND, MD.
Zone: 6-7
Name: TRAY
Join Date: Mar 2011
Posts: 151
BananaBucks
: 38,903
Feedback: 0 / 0%
Said "Thanks" 543 Times
Was
Thanked 182 Times in 82 Posts
Said "Welcome to Bananas" 681 Times
|
Quote:
|
|
|
|
|
| Said thanks: |
|
01-19-2014, 08:40 AM
|
#4 (permalink) |

Zone: 10A
Join Date: Mar 2011
Posts: 476
BananaBucks
: 119,923
Feedback: 2 / 100%
Said "Thanks" 446 Times
Was
Thanked 913 Times in 262 Posts
Said "Welcome to Bananas" 24 Times
|
I think I've seen some interesting things done with sand and polymers on TV. That might give you some protection from chipping and cracking where it gets really thin.
Could you make it all concrete and use two pours with contrasting colors? One for the decoration and the second for everywhere else including final surface. I don't know if you could color it afterward with stains. |
|
|
|
|
01-19-2014, 09:37 AM
|
#5 (permalink) |
|
Zone: 10A
Join Date: Mar 2011
Posts: 476
BananaBucks
: 119,923
Feedback: 2 / 100%
Said "Thanks" 446 Times
Was
Thanked 913 Times in 262 Posts
Said "Welcome to Bananas" 24 Times
|
Mmmmmmm ....... Pancakes......nom nom nom
|
|
|
|
|
Sponsors |
|
01-19-2014, 05:41 PM
|
#6 (permalink) |
|
container grower

Location: Southwest Ohio U.S.A.🇺🇸
Zone: HZ 6/5 Microclimate - Elevation 750 feet- 228.60 meters
Join Date: May 2012
Posts: 8,884
BananaBucks
: 5
Feedback: 7 / 100%
Said "Thanks" 3,919 Times
Was
Thanked 11,798 Times in 4,918 Posts
Said "Welcome to Bananas" 1,959 Times
|
I believe it is 1/4 steel or whatever the artist chose; bent in the form of the designs he chose to fill his designs.
The materials are readily available at Big Box stores , sold as Landscape metal trim or border. This material is easily bent in any form that you chose; this material will hold its form due to the thickness of the material, and it is permanent . It is almost like stained glass ......but with different materials...garden stuff, and it will look cool for a long time, I have never done it , however I have seen many gardens use this technique in some of the garden tours that I have been on. Looks like you can get good detail.......Don't you think? |
|
|
|
| Said thanks: |
|
01-19-2014, 06:12 PM
|
#7 (permalink) | |
|
Location: CUMBERLAND, MD.
Zone: 6-7
Name: TRAY
Join Date: Mar 2011
Posts: 151
BananaBucks
: 38,903
Feedback: 0 / 0%
Said "Thanks" 543 Times
Was
Thanked 182 Times in 82 Posts
Said "Welcome to Bananas" 681 Times
|
Quote:
|
|
|
|
|
|
01-19-2014, 06:33 PM
|
#8 (permalink) |
|
Location: CUMBERLAND, MD.
Zone: 6-7
Name: TRAY
Join Date: Mar 2011
Posts: 151
BananaBucks
: 38,903
Feedback: 0 / 0%
Said "Thanks" 543 Times
Was
Thanked 182 Times in 82 Posts
Said "Welcome to Bananas" 681 Times
|
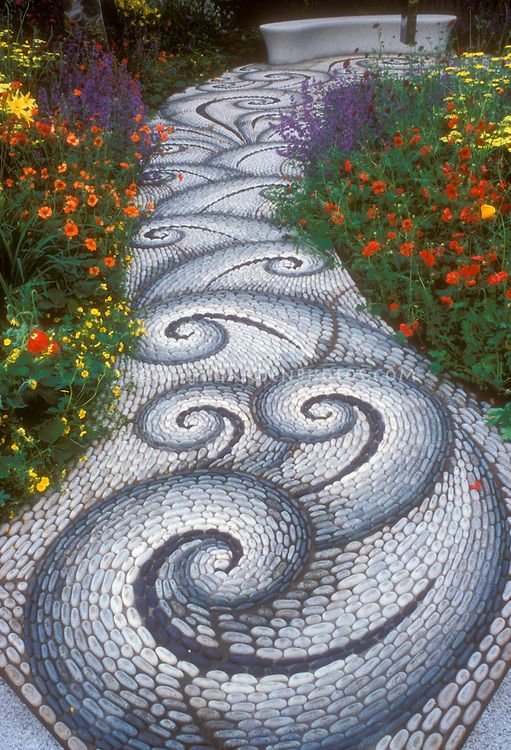
Here is another cool pic i found..A Mosaic Garden Path done with all hand laid small river stones. A work of art and well beyond anything i could pull off. Even if it was set up like one of those paint by numbers thing, i wouldn't have the patience lol.
 |
|
|
|
|
01-19-2014, 06:41 PM
|
#9 (permalink) |

Location: Penticton, BC, Okanagan Valley, Canada
Zone: Hardiness Zone 6
Name: Olaf
Join Date: Apr 2010
Posts: 1,705
BananaBucks
: 297,528
Feedback: 0 / 0%
Said "Thanks" 2,050 Times
Was
Thanked 2,012 Times in 876 Posts
Said "Welcome to Bananas" 77 Times
|
Hi Tray,
I have a lot of thoughts. As one, who has done a fair amount of ornamental concrete work, I envy you this idea and pattern. First to your question: No, the tips will not break off. As long as you Carve the whole area for the pattern out of undisturbed soil down to 4 inches below finished grade, remove all lose dirt and fill the bottom two inches with fairly clean sand. Soak the sand thoroughly and let it sit for at least two days or until it has settled down firmly Buy one 4X8 feet sheet of 1/8th inch thick hardboard (particle board or whatever it is called in your region and cut it on a table saw lengthwise into two inch wide strips. That should give you about 23 strips or just over 180 lf. Probably not quite enough, but you can re-use some of them. Get at least 200 ea 18 or 24 inch long stakes. Any contractor for roads and services or and surveyor can tell you where to get those. Those will probably not be enough, but while some will be damaged, while pounding them in, most will probably be re-usable. Make sure, that the surface of the sand is completely even and smooth, by scarifying it with a straight board in all directions. Now comes the hard part: You should draw the concept of your pattern with fine lines in the sand. It helps greatly, if you have drawn up the pattern on a sheet of paper and can proportion it on the sand patch. Then start with the stems. They should probably be about 5 inches wide. Once you have the alignment on one side fixed, the other side follows easily. The strips should be standing on edge and be secured with stakes no further than 12 c/c apart. The trick here is to get the connections between two strips flawless. That will always take two stakes side by side Sorry, Tray, the football game is starting. This will get you started thinking. I will continue tonight or tomorrow For now, Olaf
__________________
The reason I joined this forum was to share experiences, my own and those of others and to learn from them. |
|
|
|
| Said thanks: |
|
01-19-2014, 07:30 PM
|
#10 (permalink) |
|
Location: CUMBERLAND, MD.
Zone: 6-7
Name: TRAY
Join Date: Mar 2011
Posts: 151
BananaBucks
: 38,903
Feedback: 0 / 0%
Said "Thanks" 543 Times
Was
Thanked 182 Times in 82 Posts
Said "Welcome to Bananas" 681 Times
|
[quote=Olafhenny;238114][size="3"]Hi Tray,
I have a lot of thoughts. As one, who has done a fair amount of ornamental concrete work... I understand exactly what your saying as far as setting up a form. Thanks for the tips. The key word is ornamental, and this is a great design for such, but this is set up for foot traffic. Without knowing how the artist/contractor did this, (first pic) based on what i know and can see, i have to argue that.. sharp edges, raised thin concrete,(no support that i can see)..foot, weight, forward motion equals chip, crack, or break. I'm no expert in concrete, but based on what i can see i would say this setup is flawed or most likely the artist knows something i don't. Hence the reason i'm asking, cause i wouldn't stake my rep on this as i am seeing the set up cause loose gravel is not going to support it. Even if he used rebar or whatever, i still argue the edges will break or chip as stated above. But i welcome anyones expertise on this matter, thank you. |
|
|
|
|
01-19-2014, 07:59 PM
|
#11 (permalink) |
|
Banned
Location: San Diego
Zone: 9-11
Name: Tony
Join Date: Apr 2008
Posts: 18,429
BananaBucks
: 1,627,784
Feedback: 8 / 100%
Said "Thanks" 3,210 Times
Was
Thanked 20,593 Times in 7,760 Posts
Said "Welcome to Bananas" 2,716 Times
|
?
|
|
|
|
|
01-19-2014, 08:03 PM
|
#12 (permalink) | |
|
Location: CUMBERLAND, MD.
Zone: 6-7
Name: TRAY
Join Date: Mar 2011
Posts: 151
BananaBucks
: 38,903
Feedback: 0 / 0%
Said "Thanks" 543 Times
Was
Thanked 182 Times in 82 Posts
Said "Welcome to Bananas" 681 Times
|
Quote:
|
|
|
|
|
|
01-19-2014, 11:03 PM
|
#13 (permalink) |
|
Location: Penticton, BC, Okanagan Valley, Canada
Zone: Hardiness Zone 6
Name: Olaf
Join Date: Apr 2010
Posts: 1,705
BananaBucks
: 297,528
Feedback: 0 / 0%
Said "Thanks" 2,050 Times
Was
Thanked 2,012 Times in 876 Posts
Said "Welcome to Bananas" 77 Times
|
Hi again, Tray,
I have now completed my how to, proof read it, cleaned it up a bit for easier reading and posted the whole thing again. I have a lot of thoughts. As one, who has done a fair amount of ornamental concrete work, I envy you this idea and pattern. First to your question: No, the tips will not break off. As long as you Carve the whole area for the walkway out of undisturbed soil down to 4 inches below finished grade, remove all lose dirt and fill the bottom two inches with fairly clean sand. Soak the sand thoroughly and let it sit for at least two days or until it has settled down firmly Buy one 4X8 feet sheet of 1/8th inch thick hardboard (particle board or whatever it is called in your region) and cut it on a table saw lengthwise into two inch wide strips. That should give you about 23 strips or just over 180 lf. Probably not quite enough, but you can re-use some of them. Get at least 200 ea 18 or 24 inch long stakes. Any contractor for roads and services or any surveyor can tell you where to get those. Those will probably not be enough, but while some will be damaged, while pounding them in, most will probably be re-usable. Make sure, that the surface of the sand is completely even and smooth, by scarifying it with a straight board in all directions. Now comes the hard part: You should draw the concept of your pattern with fine lines in the sand. It helps greatly, if you have drawn up the pattern on a sheet of paper and can proportion it on the sand patch accordingly. Then start with the stems. They should probably be about 5 to 6 inches wide. The strips should be standing on edge and be secured with stakes no further than 12 c/c apart. The trick here is to get the connections between two strips flawless. That will always take two stakes side by side. It should be flawless on the visible top, but still a good match further down. Once you have the alignment on one side fixed, the other side follows easily After you have the stems formed and are sure about the proportions for the rest of the pattern, it is time for the concrete work. You should use for that bagged construction grade concrete. The dealer may look funny at you, asking for that, but in some regions they may still sell the much weaker fence post concrete, which is not enough. Because of the curved pattern of the stems you will not need any expansion /contraction joints, but due to the length of the stems I would strongly recommend, that you place two #2 or 3 reinforcing steel all along the stems. For that you place just enough concrete on the sand to cover it and place the rebars on top. It is important to put the rebar low, because that is where the tensile stress will be, in case of any ground settlement. Then, while the concrete under the re-bars is still fresh, fill up the form to the top, vibrate the concrete to release all the trapped air, let it sit for about an hour or two then screet off any excess and smooth the top with a steel trowel. To make the job perfect, get yourself an edge finishing tool, which will put a small rounding to the top edges. Once the concrete surface is finished and set up a bit, after a few hours, you should cover it with anything, which will hold water for a while. Burlap, sand leaves grass clippings, and keep it watered, because it is important to keep the surface of the concrete from drying out for at least two weeks. Once you have the stems finished you are experienced enough to tackle the petals. If the curvature is in places too sharp to bend the hardboard straps easily, you may want to try to soak one of them overnight. I do not know if it will stand up to that, but it is worth a try. Once in place, you may have to let it dry again in order to re- establish its strength. After one day it will be safe to take off the forms and re-use them. After two days you can step on it, if you stay away from the edges (hard to do with the narrow stems, I just mention it as a guide line) . After 28 days concrete is assumed to have attained design strength, though it will still harden further marginally. You will not need any reinforcing in the petals. If you are concerned about the sharp tips of the petals breaking off you can always support them with concrete wedges stopping ½ inch below the top. I have written down all that I can think of in the first run-through, but I am sure, that I have forgotten a thing or two. So feel free to ask any questions you may have. Good luck, Olaf
__________________
The reason I joined this forum was to share experiences, my own and those of others and to learn from them. |
|
|
|
| Said thanks: |
|
01-20-2014, 12:03 AM
|
#14 (permalink) | |||
|
Location: Penticton, BC, Okanagan Valley, Canada
Zone: Hardiness Zone 6
Name: Olaf
Join Date: Apr 2010
Posts: 1,705
BananaBucks
: 297,528
Feedback: 0 / 0%
Said "Thanks" 2,050 Times
Was
Thanked 2,012 Times in 876 Posts
Said "Welcome to Bananas" 77 Times
|
Quote:
slaps for our gazebo two inches thick unreinforced twelve years ago and have not had any problems with them since. I am a (civil) construction engineer thus the design of roads an sidewalks is part of my professional experience. But if it gives you more peace of mind, then you can carve out the area for that walkway 5 inches deep, slice the hardboard strips 3 inches wide and toss in the concrete 3 inches deep. It is your dime. Everything else remains as described. That crack from Sunfish about rubber was a joke about the curved forms required for the shaping of the pattern Quote:
sand thoroughly and let it settle down), then this ornament is supported by the whole planet.  Quote:
like I used to be, would write up the specifications by which the contractor would install it. These specs would not be anywhere near as detailed as, what I have written up for you, because the contractor knows more about the practical work than I do. I would typically just give him the dimensions and thicknesses and he would take it from there competently. You would have a tough time knocking those edges of properly cured concrete with a hammer. Shoes won't do it. Just keep the concrete moist for at least a couple of weeks and that installation will outlive you. Again good luck, Olaf
__________________
The reason I joined this forum was to share experiences, my own and those of others and to learn from them. |
|||
|
|
|
| Said thanks: |
|
01-20-2014, 10:22 AM
|
#15 (permalink) |
|
Banned
Location: San Diego
Zone: 9-11
Name: Tony
Join Date: Apr 2008
Posts: 18,429
BananaBucks
: 1,627,784
Feedback: 8 / 100%
Said "Thanks" 3,210 Times
Was
Thanked 20,593 Times in 7,760 Posts
Said "Welcome to Bananas" 2,716 Times
|
How do you pour concrete and finish it ?
|
|
|
|
| Said thanks: |
|
01-20-2014, 01:28 PM
|
#16 (permalink) |
|
Location: Penticton, BC, Okanagan Valley, Canada
Zone: Hardiness Zone 6
Name: Olaf
Join Date: Apr 2010
Posts: 1,705
BananaBucks
: 297,528
Feedback: 0 / 0%
Said "Thanks" 2,050 Times
Was
Thanked 2,012 Times in 876 Posts
Said "Welcome to Bananas" 77 Times
|
Yes, KJ, you are probably correct, if you assume, that this is a photo of a set piece in a
garden or landscaping show. Not only because of the points you brought up, but also those large pebbles are uncomfortable as hell to walk on. However that is easily circumvented without losing the overall effect, by using crushed landscaping rock, a DIY project, or, this would require the skills and experience of a contractor, exposed aggregate concrete or spreading a single layer of landscaping rock over fresh concrete and rolling it in with a hand roller. Dark lava would be quite dramatic, but you would have to figure out the best, that is locally available. Alternatively you could use grass as a filler or such low height, traffic tolerant, ground covers as blue star creeper or brass buttons. But the latter two would need hundreds of plants and a couple of years of build-up (and weeding) before full cover is achieved. I have in my blurb below only addressed the construction of the ornamental flower. Best, Olaf
__________________
The reason I joined this forum was to share experiences, my own and those of others and to learn from them. |
|
|
|
| Said thanks: |
| | Are you a banana plant enthusiast? Then we hope you will join the community. You will gain access to post, create threads, private message, upload images, join groups and more. |
|
Sponsors |
|
01-20-2014, 05:05 PM
|
#17 (permalink) | |
|
Location: CUMBERLAND, MD.
Zone: 6-7
Name: TRAY
Join Date: Mar 2011
Posts: 151
BananaBucks
: 38,903
Feedback: 0 / 0%
Said "Thanks" 543 Times
Was
Thanked 182 Times in 82 Posts
Said "Welcome to Bananas" 681 Times
|
Quote:
|
|
|
|
|
|
01-20-2014, 05:11 PM
|
#18 (permalink) | |
|
Location: Penticton, BC, Okanagan Valley, Canada
Zone: Hardiness Zone 6
Name: Olaf
Join Date: Apr 2010
Posts: 1,705
BananaBucks
: 297,528
Feedback: 0 / 0%
Said "Thanks" 2,050 Times
Was
Thanked 2,012 Times in 876 Posts
Said "Welcome to Bananas" 77 Times
|
Quote:
It is all in my write-up below. If you have questions beyond that, you will have to be a bit more specific. 
__________________
The reason I joined this forum was to share experiences, my own and those of others and to learn from them. |
|
|
|
|
|
01-20-2014, 05:20 PM
|
#19 (permalink) | |
|
Location: Penticton, BC, Okanagan Valley, Canada
Zone: Hardiness Zone 6
Name: Olaf
Join Date: Apr 2010
Posts: 1,705
BananaBucks
: 297,528
Feedback: 0 / 0%
Said "Thanks" 2,050 Times
Was
Thanked 2,012 Times in 876 Posts
Said "Welcome to Bananas" 77 Times
|
Quote:
The fact, that it appears to be a show piece, should not deter you from copying the design. Actually that is what such show pieces are for, to inspire creativity.
__________________
The reason I joined this forum was to share experiences, my own and those of others and to learn from them. |
|
|
|
|
| Said thanks: |
|
01-20-2014, 06:30 PM
|
#20 (permalink) |
|
Banned
Location: San Diego
Zone: 9-11
Name: Tony
Join Date: Apr 2008
Posts: 18,429
BananaBucks
: 1,627,784
Feedback: 8 / 100%
Said "Thanks" 3,210 Times
Was
Thanked 20,593 Times in 7,760 Posts
Said "Welcome to Bananas" 2,716 Times
|
Actually that is what such show pieces are for, to sell stuff
|
|
|
|
|
Sponsors |
|
Email this Page
|
| Currently Active Users Viewing This Thread: 1 (0 members and 1 guests) | |
|
|
|
Similar Threads
|
||||
| Thread | Thread Starter | Forum | Replies | Last Post |
| Thoughts on the Fukushima contamination | momoese | Tiki Hut | 30 | 09-04-2013 06:04 AM |
| What are your thoughts on neem oil and banana plants??? | rickiepeter | Main Banana Discussion | 3 | 06-04-2012 08:50 PM |
| Thoughts about bananas | tropicalkid | Tiki Hut | 20 | 06-15-2008 08:13 AM |
| Is this still a Zebrina? Any and all thoughts | cactus6103 | Banana Identification | 4 | 10-03-2007 03:53 PM |
| Thoughts and prayers.... | Carolina | Main Banana Discussion | 4 | 06-14-2006 08:59 AM |